
|
Go To | Matchprint | Color-Key™ III Film |
Color-Key™ III Negative Overlay Proofing Films - SWOP® Product Information
[ Download the PDF version of this file. ( 352K ) ]
Description
- Color-Key™ III negative overlay proofing films - SWOP® are negative-acting films designed to simulate the process ink hue and density specifications for web offset publications (SWOP).
- Production of a Color-Key™ III proof involves three steps for each color: expose, process and mount.
- When complete, a Color-Key™ III proof is composed of exposed and processed color sheets (overlays) mounted on paper base.
Step 1: Expose
- Place the first Color-Key™ III color sheet, coated side up, on the vacuum frame mat.
- Next, place the color separation film, emulsion (dull) side down, on the coated side of the Color-Key™ III color sheet.
- Position the exposure target elements on a non-image area of the proof. For optimum exposure control, use a 10-step gray scale (0.15 density difference between steps) together with the 3M™ Matchprint™ color element or UGRA scale. Invert the 10-step gray scale so it is wrong-reading on the proof.
- Expose the film using the exposure value determined by the exposure optimization procedure. See Exposure Optimization.
Exposure Guidelines
- Gray Scale Reading (with scale wrong-reading): Solid Step 5
- Microline Resolution (while holding dot resolution at 2% - 98%):
Matchprint™ Color Element: 2 - 6 microlines
UGRA Scale: 8 - 10 microlines
Exposure Tips
- Use a properly maintained vacuum exposure frame.
- Use a combination bulb that has a strong spectral output between 350 to 380 nanometers. Maintain and replace bulbs according to manufacturer's recommendations.
- To maintain consistent exposure, place the exposure control targets in the same place on the proof, or "working position," for all exposures.
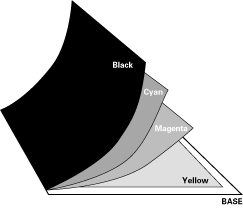
Mounting Sequence
A completed Color-Key™ III negative proof is composed of separate layers (overlays) mounted, coated side up, in register on paper base. For a four-color process proof, the exposed and processed layers are mounted in yellow, magenta, cyan, black (YMCK) sequence.
Which Side is Coated?
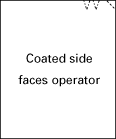 Hold a sheet of Color-Key™ III proofing film with the long edges vertical. With the clipped corner or notches in the right corner of the top edge, the coated side faces you. If the color sheet is cut to a smaller size, or notches are not present, an alternate method is to scratch each side of the sheet with a sharp object. Scratching removes a small amount of color from the coated side.
Step 2: Process
- Process the Color-Key™ III film, coated side up, using either the Model 2430 Proofing Processor, Model 2425 Proofing Processor or Model 2635 Proofer.
- Color-Key™ III films are processed with Color Proofing III Developer which is available premixed and ready to use or as a concentrate for use with the Model 2571 Developer Mixer.
After processing the first color film, repeat the expose and process steps for each additional color.
Before operating a laminator or processor, consult the Operator's Guide for correct operating procedures and important safety information.
Before handling or using any chemical product, be sure to read the Material Safety Data Sheet for health hazard data, precautionary information and suggested first aid.
Step 3: Mount
- For a four-color process proof, the mounting sequence is YMCK (yellow, magenta, cyan, black).
- Mount the exposed and processed color layers in register, coated side up, on the paper base. Secure each sheet to the base with tape.
Exposure Optimization
It is necessary to determine proper exposure values for each color layer of a Color-Key™ III proof. Perform exposure optimization when you set up a Color-Key™ proofing system, use a new lot of material, replace an exposure bulb or change any piece of proofing equipment. With the variety of films, equipment and methods in use today to produce color separations, it is important to include your films along with commonly used exposure targets when optimizing exposures.
Recommended target elements for setting exposures:
- A minimum of ONE 10-step gray scale with 0.15 density difference between steps such as the 3M™ Transparent Sensitivity Guide. Place the gray scale(s) wrong-reading on the proofing material.
- A hard-dot scale which includes microline patches and 2% and 98% tint areas, such as the Matchprint™ color element or UGRA scale.
- Production film, using your standard screen ruling and output device, that shows 2%, 3%, 25%, 50%, 75% 97%, 98% tint areas (at a minimum) and solid areas. The 3M™ Matchprint™ Digital Press/Proof Target, available through your Imation sales representative, includes these elements.
How to determine proper exposure:
- As a starting point, find the exposure value for each color layer that produces a solid Step 5 gray scale reading with the scale wrong-reading.
- Adjust exposures as necessary for each color layer to achieve optimum resolution of the highlight and shadow dots on your films. If microline resolution is the choice for monitoring exposure, use a reading of 8 - 10 microlines as a starting point.
- Determine the acceptable exposure range. Once optimum exposure is identified for each color, perform an exposure series to determine the acceptable exposure range on either side of that point that holds the desired resolution.
For hard dot film, such as the Matchprint™ color element or UGRA scale, the acceptable gray scale range can be wider than plus or minus 1.0 step, depending on the color. For soft dot film, the acceptable range most likely will be different from hard dot film and depends on the quality of the finished film. It is important to identify the acceptable exposure for the films you will be using to make your proof.
How to maintain optimum exposure:
Some gray scale fluctuation is normal with Color-Key™ III proofing material without affecting image quality. Because of gray scale fluctuation, it is important that operators do not overcontrol exposures. Knowing when to adjust exposure is important to minimize overcontrol.
Use this rule of thumb: if the gray scale varies one step within the established range on a given color, DO NOT adjust exposure. Adjust ONLY if an upward or downward trend in the gray scale reading is established, or after a third consistent exposure, either high or low. Then, adjust to the center point.

 Exposure Target Elements
Place test proofs and targets in the same location in the exposure frame for each exposure. Run each test proof through the processor in the same direction. Expose each color according to recommended gray scale readings and check highlights, shadows and microlines.
Gray Scale Example
The illustration shows a Solid Step 5 with the scale wrong-reading. You may observe several ghost steps. The only significant gray scale step is the last solid one. A gray scale step is considered solid when the density of the step is equivalent to the solid density of the color.
Other Information
Processing Accessories
The following accessories are available for use with the Model 2430 processor or the Model 2425 processor:
- Model 2570 Water Recirculator
- Model 2571 Developer Mixer
- Model 2572 Disposal Unit
Developer
Packaging options for Color Proofing III Developer include:
- 2.5 gallons
- 5 .0 gallons
- Dry concentrate for use with the Model 2571 Developer Mixer.
Viewing
Lighting is critical and must conform to industry standards for viewing proofs and prints. Use 5000° Kelvin lighting in a neutral gray surround to compare Color-Key™III proofs and transparencies.
Sizes
Seven standard sizes from 10" x 12" (254mm x 305mm) to 30" x 40" (762mmx1016mm). Also available in 200-ft (61m) rolls.
Base
Navajo Ultrawhite™ 80# Cover stock
Custom Colors
In addition to process colors, the following custom colors are available:
- red
- green
- blue
- brown
- orange
- light grey
- dark grey
- light blue
- beige
- rubine
|
- yellow
- pink
- purple
- metallic gold
- metallic silver
- opaque white
- lime green*
- sunset*
- mahogany*
|
*Available Q1 '97
Handling Considerations
Do . .
- Handle Color-Key™ III negative proofs under yellow, or equivalent, lighting.
- Store unexposed color sheets in a light-tight container, in a flat position, at a temperature no higher than 80°F (27°C), with a relative humidity of less than 50%.
- Protect each layer of a Color-Key™ III proof with a sheet of paper during shipment. Heat and pressure during shipping can cause image transfer if the image side of proofs is not properly protected. Use paper such as bond, printing or vellum. Do NOT use polyester film.
Do not . .
- Expose finished proofs to temperatures over 90°F (32°C) for extended periods.
- Ship Color-Key™ III proofs face-to-face without a paper slip sheet between them.
Additional Information
For more information on the Color-Key™ proof-making process, call the Imation C.A.R.E. Center at 1-800-328-1303.
Color-Key, Matchprint, Rainbow, Travan and Viking are trademarks of Imation Enterprises Corp. 3M and Scotch are trademarks of 3M Company. SWOP is a registered trademark of SWOP, Inc.
The quality systems of our Imation facilities have been Registered by UL to the ISO 9000 Series Standards.
Important Notice to Purchaser:
All statements, technical information and recommendations contained herein are based on tests Imation believes to be reliable, but the accuracy of this information is not guaranteed.
Limited Warranty and Limitation of Remedies:
Imation warrants only that the Imation Products described above will meet the published warranty applicable to said Imation Products.
THIS WARRANTY IS MADE IN LIEU OF ALL OTHER WARRANTIES, EXPRESS OR IMPLIED, INCLUDING BUT NOT LIMITED TO THE IMPLIED WARRANTY OF MERCHANTABILITY, THE IMPLIED WARRANTY OF FITNESS FOR ANY PARTICULAR PURPOSE OR ANY IMPLIED WARRANTY ARISING OUT OF A COURSE OF DEALING OR OF PERFORMANCE, CUSTOM OR USAGE OF TRADE EXCEPT OF TITLE AND AGAINST PATENT INFRINGEMENT.
If any Imation product is found not to meet the above-stated warranty, Purchaser's exclusive remedy and Imation's and/or Seller's only obligation is to repair, replace the product or refund the purchase price, at Imation's or Seller's option, within a reasonable time after written notification but no later than sixty (60) days after discovery of the defect, all as specifically stated in Imation's published warranty.
IMATION WILL NOT UNDER ANY CIRCUMSTANCES BE LIABLE FOR ANY INDIRECT, INCIDENTAL, SPECIAL OR CONSEQUENTIAL DAMAGES (INCLUDING BUT NOT LIMITED TO LOSS OF PROFITS, REVENUE, OR BUSINESS) IN ANY WAY RELATED TO THE IMATION PRODUCTS, REGARDLESS OF THE LEGAL THEORY ASSERTED.


Copyright 1996 Imation. All rights reserved.

|


